
Imperial Knights combat and armor-break
Visible encounters, four commands, and why Repair Kits belong in every pack.
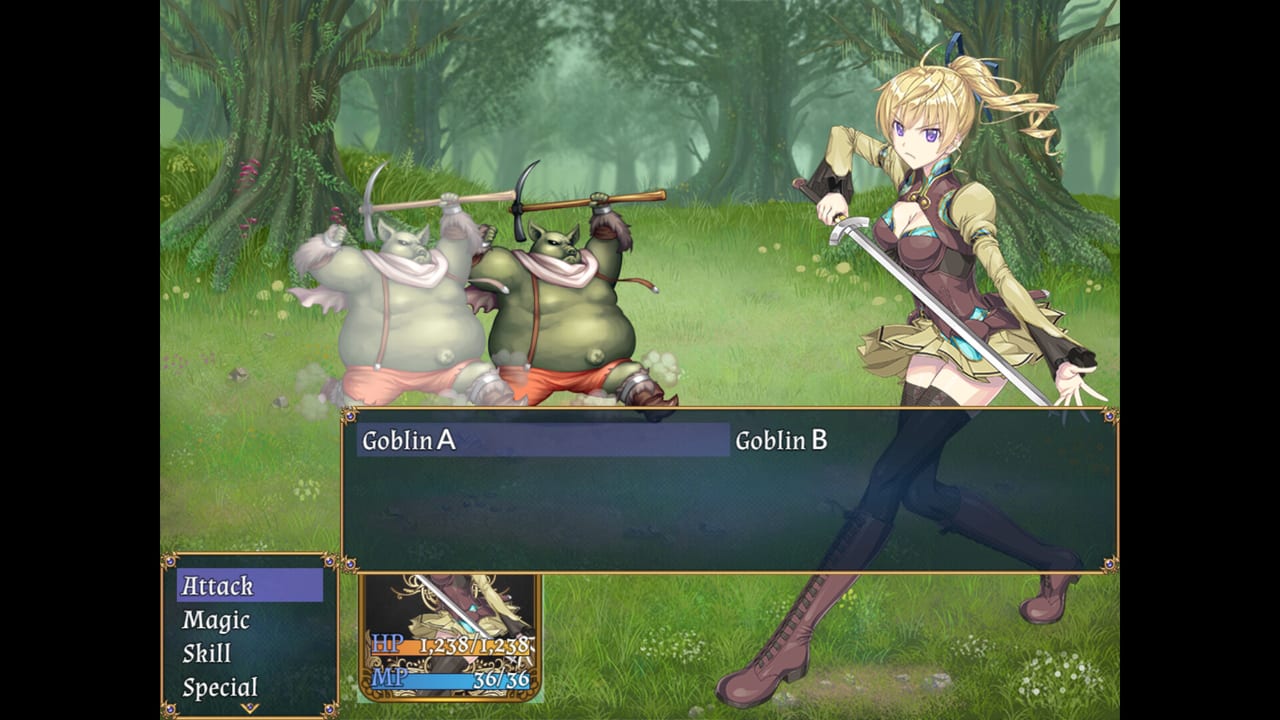
Imperial Knights uses turn-based command battles on top of an RPG Maker map with visible enemies. You see the pack. You choose to touch it. There are no hidden back-attacks. That sounds gentle until a three-goblin clump hits a level 3 Diana on Maldonia North Road. This page is the systems layer under the walkthrough: how a round works, what armor-break actually does, which elements matter, and how to stop throwing money at the wrong shop.
If you are still in the manor, finish getting started first. If you are staring at Mud Poison’s poison wave, skip to the boss table below.
The four-slot loop
Up to four actors fight. Diana is always available. Story women fill the other slots until the plot yanks them into mercenary status. You can hire mercenaries from the guild to plug holes — including men, who do not use the armor-break costume layer.
Each actor picks from the usual RPG Maker row:
- Attack — basic weapon hit. Diana’s early identity is thrust skills, not AoE.
- Magic — elements and utility (Lysithea’s Heal / Mina Heal / Dispel / Weapon Bless live here).
- Skill — class techniques, including Ether Knight lightning once you finish the ritual.
- Special / Defend / Item — depending on the build and whether someone is currently bound.
Speed (agility) decides who acts first. Mud Poison’s mud wave lowers agility; if you lose first strike, the fight becomes a heal check. That is why Silved’s Poison Rings belong in the cart before Seikuri, not after you wipe.
Visible encounters and when to run
Dungeons mix wander and chase AI. Packs of three are a tax on HP, not a bravery test. Run when:
- You are carrying a story NPC to a boss and cannot afford a random wipe.
- Diana is already in armor-break and you have no Repair Kit.
- You are escorting a level gap (Lea just joined, Tear just left).
Running is a command, not a shame. Japanese first-week charts tell you to flee North Road triples until one-shot range. Listen to them.
Elements and status
Enemy tables on Japanese wikis list fire, water, earth, wind, holy, dark. A few rules of thumb hold on every route:
- Plant and treant packs hate fire.
- Church enemies in Protea hate dark; demon and undead packs hate holy.
- Mud Poison is wind-weak in some charts and earth-weak in others depending on the translation of the same Japanese row — pack both a wind option and an earth card if you have them, and do not stake the fight on a single element.
- Sati has no usable weakness and rotates multi-element magic. Bring raw bulk and Mina Heal, not a colored sword.
Status you will actually see:
- Poison — large percentile ticks (Spirit Cave, Mud Poison). Poison Rings, Water Guard, and Dispel Herbs.
- Blind / darkness — Svalt’s demon king, catacomb Balnia. Alice Dress card or Lysithea’s Dispel.
- Sleep — final boss into a follow-up shade nuke. Sleep-null on the healer is the difference between a clear and a wipe.
- Silence — Svalt adds. Throat medicine in the bag, always.
- Paralysis — Tear Beast. Water Protection or Dispel Herbs.
Do not hoard the cure items “for later.” Later is the next named boss.
Armor-break, binds, and Repair Kits
Female fighters have a costume HP layer. Enemy skills that target clothing, or simply chunking HP, can trigger armor-break with a cut-in. After that:
- The enemy AI starts using bind / adult attacks instead of (or in addition to) normal skills.
- The bound actor loses most commands until they break free.
- If you ignore the bind, the fight snowballs because you are acting 3-wide, then 2-wide.
Repair Kits exist to restore that layer. Buy them in weapon shops the same way you buy potions. This is not optional flavor; it is the resource that keeps Diana’s skill bar available. Male mercenaries are a mechanical answer as well: they take hits without that extra fail state, which is why the party tier list sometimes ranks a boring hire above a story favorite for boss attempts.
A full party wipe plays a defeat scene and usually continues with flags set, rather than a hard game over. Exceptions exist (Silved’s madman, some story duels). The checklist marks fights where a loss is a flag versus a reset. If you are trying to keep a clean first clear, treat every visible pack as real.
Cards as equipment
Item-shop gacha spits out cards you equip like accessories. They are how Circle Poison cameos Slave’s Sword characters into this spin-off. Mechanically they are:
- Status-null (sleep, poison, blind).
- Stat-up (the Diana Knight version).
- Situational bosses (holy/dark absorb, counter).
You do not need a complete album to beat Route 1. You do want one sleep-null before the castle basement and one poison-null before Spirit Cave. Rankings live on the card tier list. Casino slots and poker on Route 3, covered in the tools hub, are extra ways to feed the same collection.
Boss tells worth memorizing
Alraune (Route 1 grove). Two plant adds, then the body. Fire-weak. Lysithea heals; Diana thrusts. Losing applies the crest.
Cardinal (Protea cathedral). Bring the secret herbal medicine from the grandmother NPC or the fight is statistically ugly. Holy-using adds, Sanctuary regen, revive around turn 9. Either burn the adds in one turn or ignore them and race the cardinal. Dark-weak. Level 12–13 is the Japanese recommendation.
Balnia (catacombs). Holy-weak. Self-damaging “botched sanctuary.” High single-target dunks. Keep HP topped, hold Stimulants.
Mud Poison (Spirit Cave). Poison tsunami about every four turns, heavy mud AoE that shreds agility. Mina Heal every round, Poison Rings on everyone, earth or wind damage. HP in charts sits around 35,000. Buy the rings in Seikuri before you enter.
Svalt demon king. Holy-weak. Darkness on the party, then three “king flesh” adds at turn 3 that silence. AoE the adds; they do not revive. Throat medicine ready.
Tear Beast (castle). Earth-weak. Auto-counter on physicals. Magic if you have it; otherwise heal through the counter — the bounce is smaller than it looks.
Sati. No weakness. Multi-element magic, periodic magic-stat down, a ~80% current-HP hit every five turns. If Lysithea is not in the four, you are doing it wrong.
Final boss. Scripted first seven turns (do nothing → water protection → magic shield → mirror wall → spell breaker → mana drain → dark shade). Sleep plus shade is the wipe combo. Sleep-null the healer. After turn 7 it becomes a dark-mage endurance fight.
Bio Worm (Route 2 facility). No element cheat. Wind-up breath on a delay is a scripted defeat if it lands, even on a boosted NG+ file. Kill it before the animation finishes.
Building for the long campaign
- One dedicated healer (Lysithea on Route 1; hire her back when she leaves).
- One physical breaker (Diana, later Ether Knight).
- One flex (Tear’s lightning, Lea, Ellis, or a mercenary).
- Cards for the next dungeon’s status, not a museum.
- Gold from guild ranks, night jobs, and selling junk — see getting started for the first income loop.
When in doubt, level is still the RPG Maker answer. North Road, guild repeats, and not skipping Repair Kits will carry a first file to the Ether Knight scene. Fancy routing belongs on routes, not in the command menu.
Frequently Asked Questions
Quick answers to the questions Imperial Knights players ask first.
How do I fix armor-break in Imperial Knights?
Use a Repair Kit from the item command. Buy kits at weapon shops before long dungeons.
Why can I not beat the Protea cardinal?
You likely skipped the herbal medicine side scene. Talk to the girl and the grandmother in Protea before the cathedral basement.
Does losing a battle game-over the file?
Usually no — it plays a defeat scene and continues with flags. A few fights are true game overs. Save before bosses anyway.
How many characters fight at once?
Four. Fill empty slots with guild mercenaries after story allies leave. See the party page.